Nacos版本:2.0.4 nacos2.x已不支持ribbon,使用nacos2.x需要手动引入LoadBalancer
1 基本使用
使用外部数据源
1
2
3
4
5
| spring.datasource.platform=mysql
db.num=1
db.url.0=jdbc:mysql://127.0.0.1:3306/mynacos?characterEncoding=utf8&connectTimeout=1000&socketTimeout=3000&autoReconnect=true
db.user=root
db.password=123456
|
1.1 本地配置
1.1.1 实现
(1)application.yml
(2)UserController
1
2
3
4
5
6
7
8
9
10
11
12
13
14
15
16
17
|
@Value("${lecturer}")
private String lecturer;
@RequestMapping("/local-config-value")
public String localConfigValue(){
return "lecturer: "+this.lecturer;
}
@Resource
private Environment environment;
@RequestMapping("/local-config-env")
public String localConfigEnv(){
return "environment lecturer: "+this.environment.getProperty("lecturer");
}
|
1.1.2 实现原理
https://docs.spring.io/spring-boot/docs/2.7.6/reference/htmlsingle/#features.external-config
(1)加载application.yml文件中的配置
PropertySourceLoader#load() -> YamlPropertySourceLoader#load() -> OriginTrackedMapPropertySource
(2)查看Environment的属性配置源
SpringApplication#run() –>debug: configureIgnoreBeanInfo(environment)
(3)比如在Program arguments中配置timeout=1000,
观察environment中的 SimpleCommandLinePropertySource
(4)@Value实现原理
1
2
3
4
5
6
| (1)使用BeanPostProcessor解析类上的@Value字段
(2)获取到字段上的@Value字段
(3)解析@Value字段的value属性值,比如age
(4)从environment中的属性配置源OriginTrackedMapPropertySource中寻找age的key
(5)根据key获取到对应的value值
(6)通过field反射的方式设置value值
|
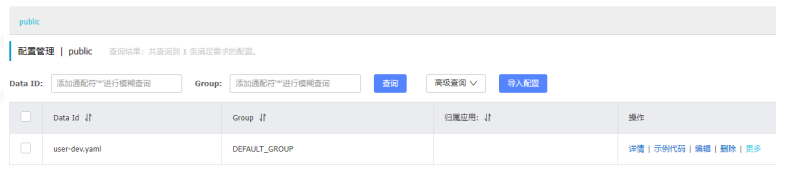
1.2 在nacos上创建配置文件
(1)创建user-dev.yaml文件
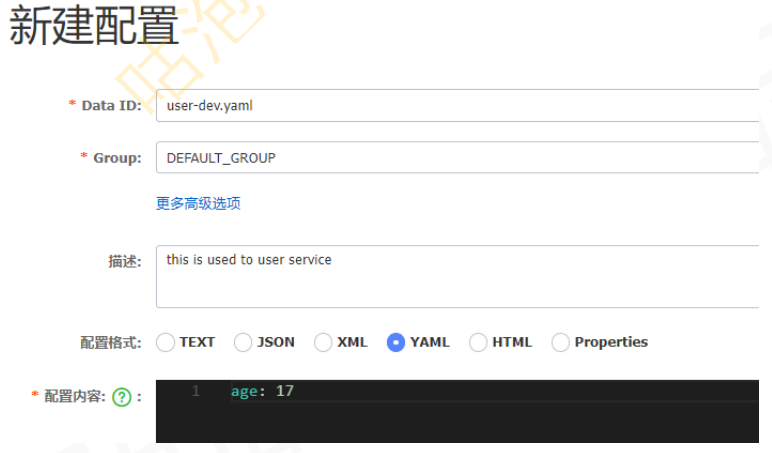
(2)文件存储位置
mysql nacos库 config_info表
nacos home
1.3 基于HTTP的配置管理
1
2
3
4
5
6
7
|
curl -X POST "http://127.0.0.1:8848/nacos/v1/cs/configs?
dataId=nacos.cfg.dataId&group=test&content=HelloWorld"
curl -X POST "http://127.0.0.1:8848/nacos/v1/cs/configs?
dataId=nacos.cfg.dataId&group=test&content=HelloWorld"
|
1.4 基于Java SDK的配置管理
https://nacos.io/zh-cn/docs/sdk.html
(1)引入nacos-client包
1
2
3
4
5
| <dependency>
<groupId>com.alibaba.nacos</groupId>
<artifactId>nacos-client</artifactId>
<version>2.0.4</version>
</dependency>
|
(2)编写Java代码
1
2
3
4
5
6
7
8
9
10
11
12
13
14
15
16
17
18
19
20
21
22
23
24
25
26
27
28
29
30
31
32
33
34
35
| public class COnfigExample{
public static void main(String[] args) throws Exception{
String serverAddr = "localhost";
String dataId = "redis.yaml";
String group = "DEFAULT_GROUP";
Properties properties = new Properties();
properties.put(PropertyKeyConst.SERVER_ADDR, serverAddr);
ConfigService configService = new NacosFactory.createConfigService(properties);
configService.addListencer(dataId, group, new Listence(){
@Override
public void receiveConfigInfo(String configInfo){
System.out.printLn("receive: " + configInfo);
}
@Override
public Executor getExecutor(){
return null;
}
});
boolean isPublishOK = configService.publishConfig(dataId, group, "redis.host: 120.0.0.1:6379");
System.out.printLn(isPublishOK);
Threan.sleep(3000);
String content = configService.getConfig(dataId, group, 5000);
System.out.printLn(content);
System.in.read();
}
}
|
(3)通过dashboard修改redis.yaml文件中的配置内容,观察监听器的回调打印信息
1.5 user服务基于SC的配置管理
(1)引入依赖
1
2
3
4
| <dependency>
<groupId>com.alibaba.cloud</groupId>
<artifactId>spring-cloud-starter-alibaba-nacos-config</artifactId>
</dependency>
|
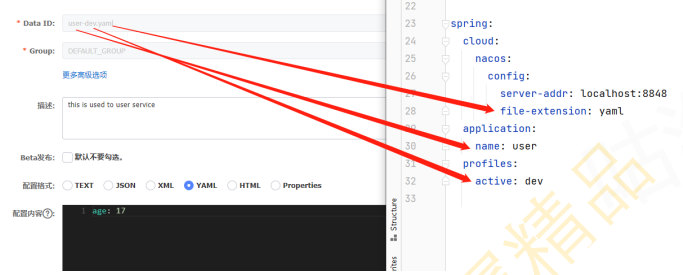
(2)在resources目录下创建bootstrap.yaml文件,并写配置
1
2
3
4
5
6
7
8
9
10
| spring:
cloud:
nacos:
config:
server-addr: localhost:8848
file-extension: yaml
application:
name: user
profiles:
active: dev
|
(3)启动user服务,如若报错如下信息,则在pom文件中添加bootstrap starter,并重新启动user服 务
1
2
3
4
| <dependency>
<groupId>org.springframework.cloud</groupId>
<artifactId>spring-cloud-starter-bootstrap</artifactId>
</dependency>
|
(4)创建访问接口
1
2
3
4
5
6
7
8
9
10
11
12
13
14
|
@Value("${age}")
private String age;
@RequestMapping("/nacos-config-value")
public String nacosConfigValue(){
return age;
}
@RequestMapping("/nacos-config-env")
public String nacosConfigEnv(){
return this.environment.getProperty("age");
}
|
(5)访问/user/nacos-config-value和/user/nacos-config-env
(6)通过dashboard修改age的值,不重启项目的情况下 访问/user/nacos-config-env,发现已经更新 访问/user/nacos-config-value,发现没有更新,在UserController上添加@RefreshScope注解后再尝试
1.6 当前服务的通用配置
创建user.yaml文件,nacos会自动加载user、user-dev.yaml、user.yaml三个配置文件
1.7 不同服务的公共配置
(1)创建公共配置文件mysql.yaml和es.yaml
(2)在bootstrap.yaml文件中添加配置
1
2
3
4
5
6
7
8
9
10
11
12
13
14
15
16
| spring:
cloud:
nacos:
config:
server-addr: localhost:8848
file-extension: yaml
shared-configs[0]:
data-id: mysql.yaml
refresh: true
extension-configs[0]:
data-id: es.yaml
refresh: true
application:
name: user
profiles:
active: dev
|
(3)启动user服务观察日志并访问

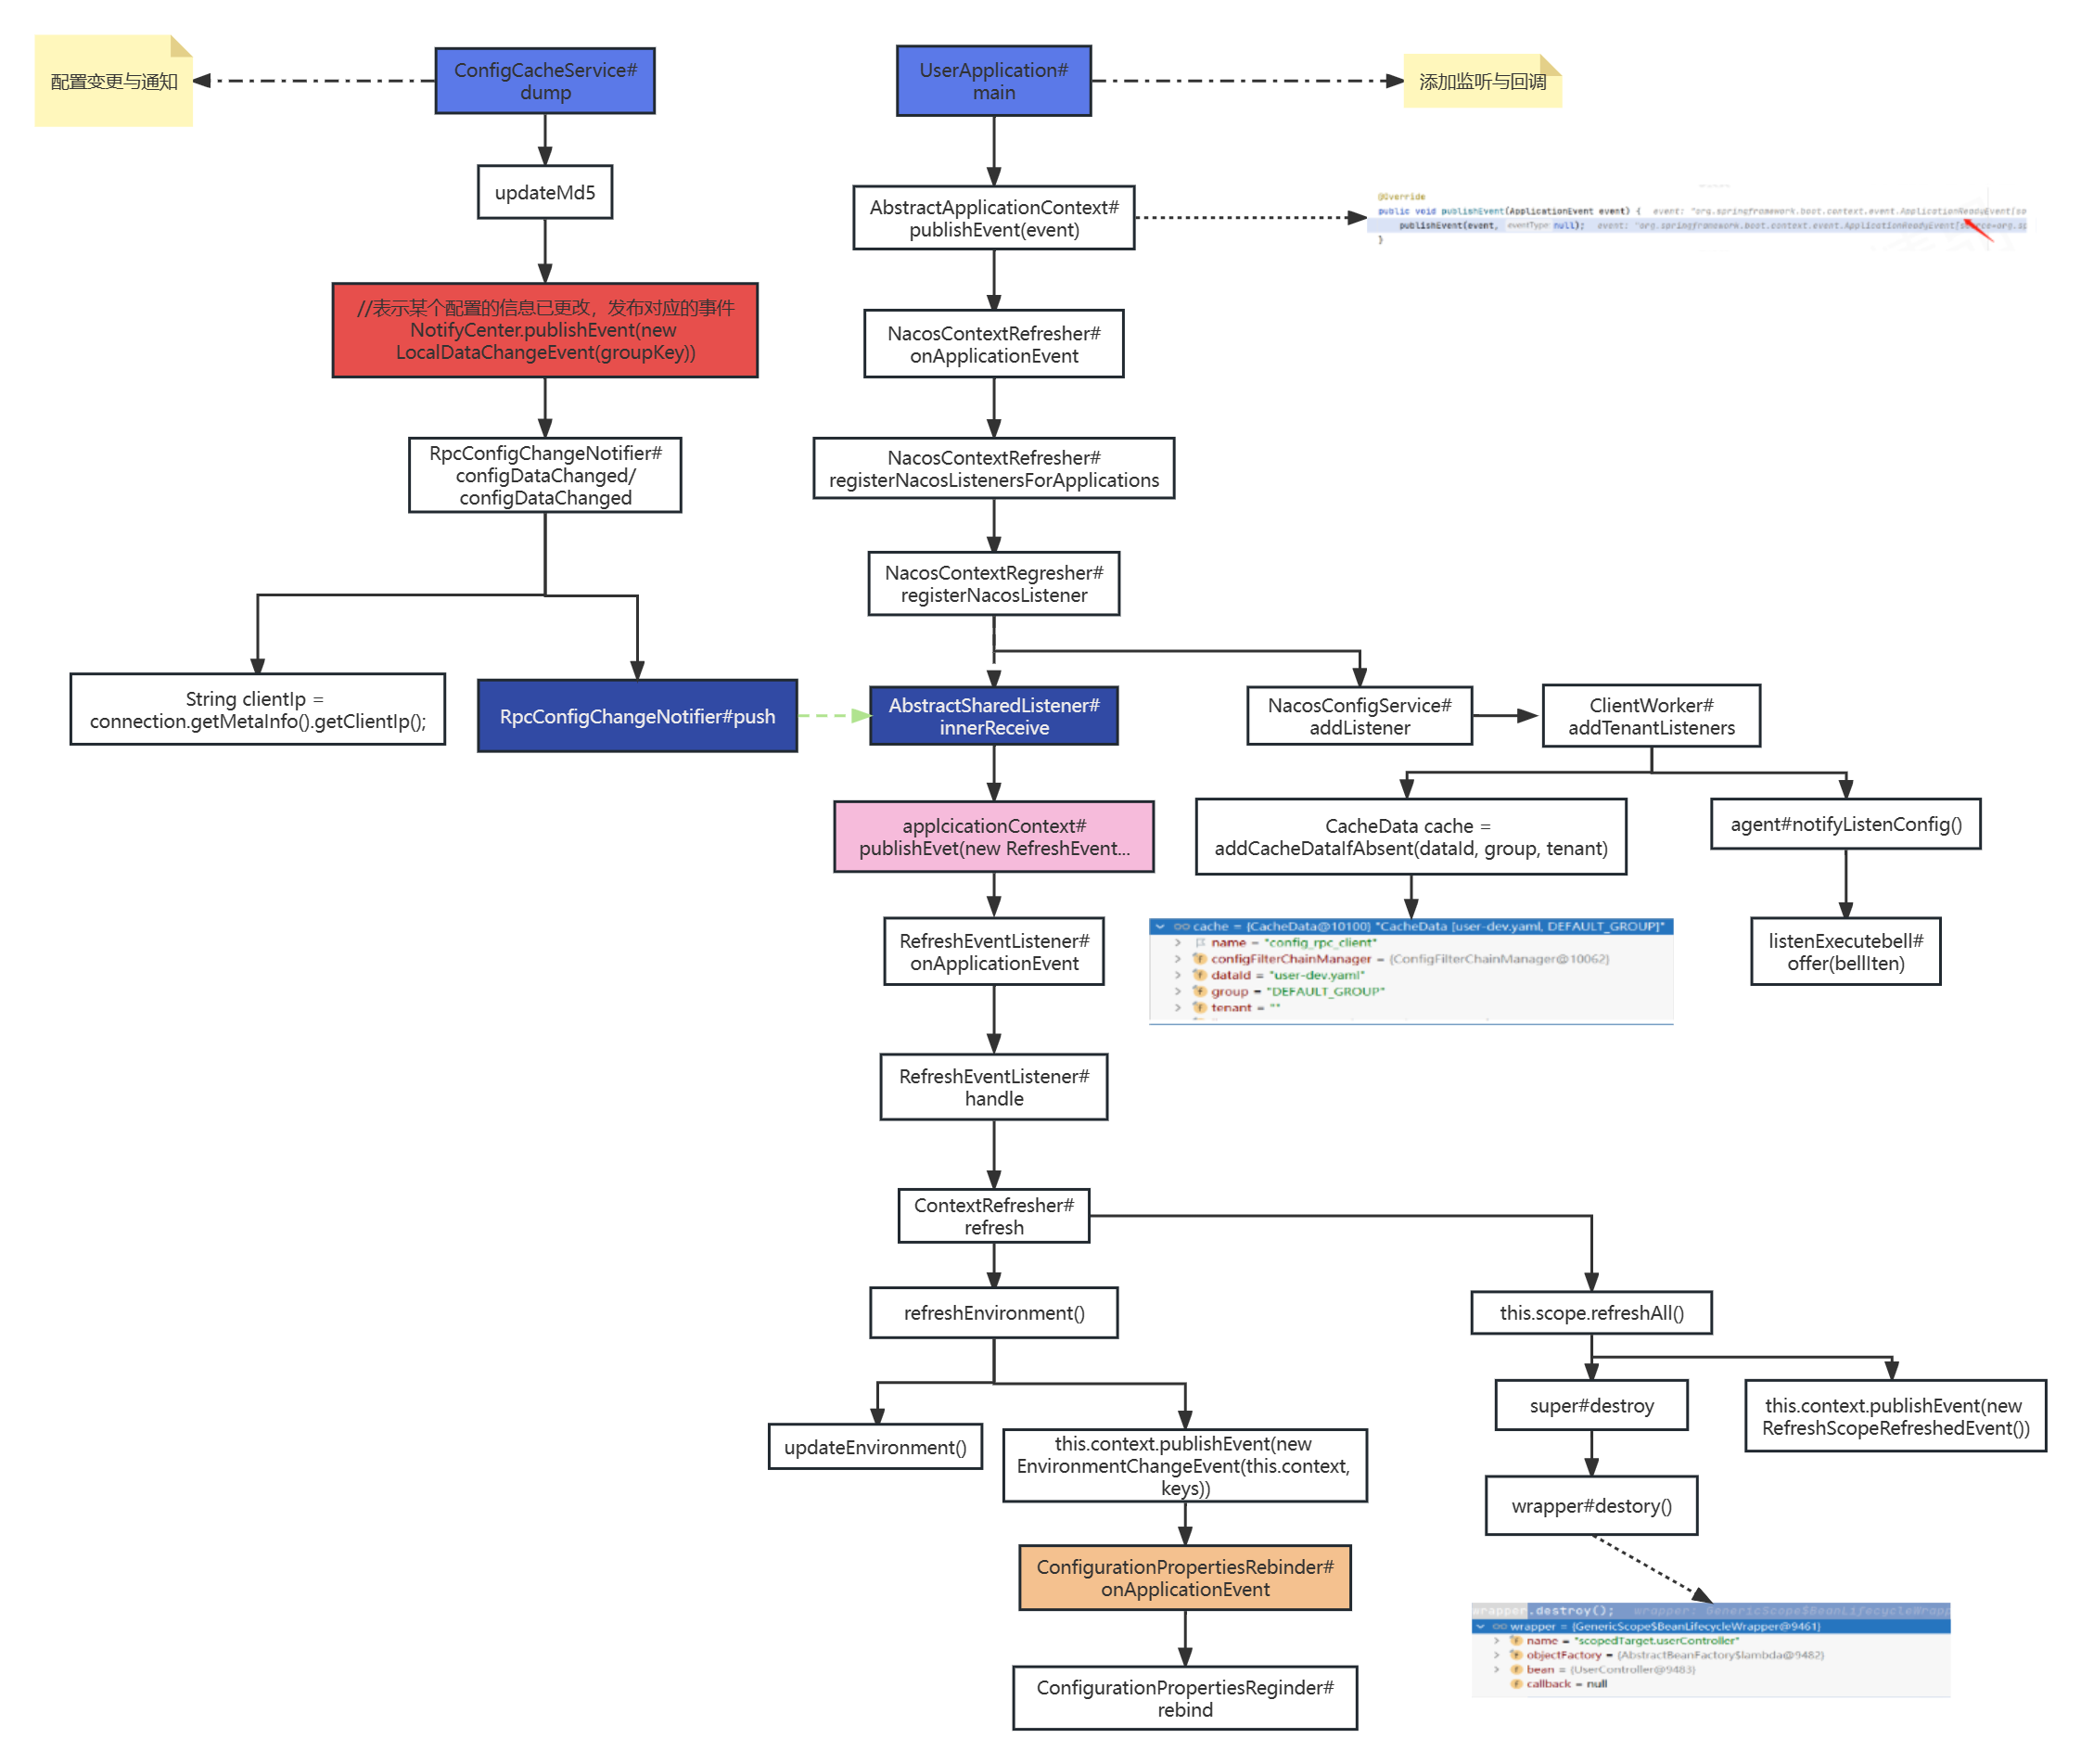
2 源码解析
2.1 nacos发布配置

2.2 Spring Boot启动调用Nacos API
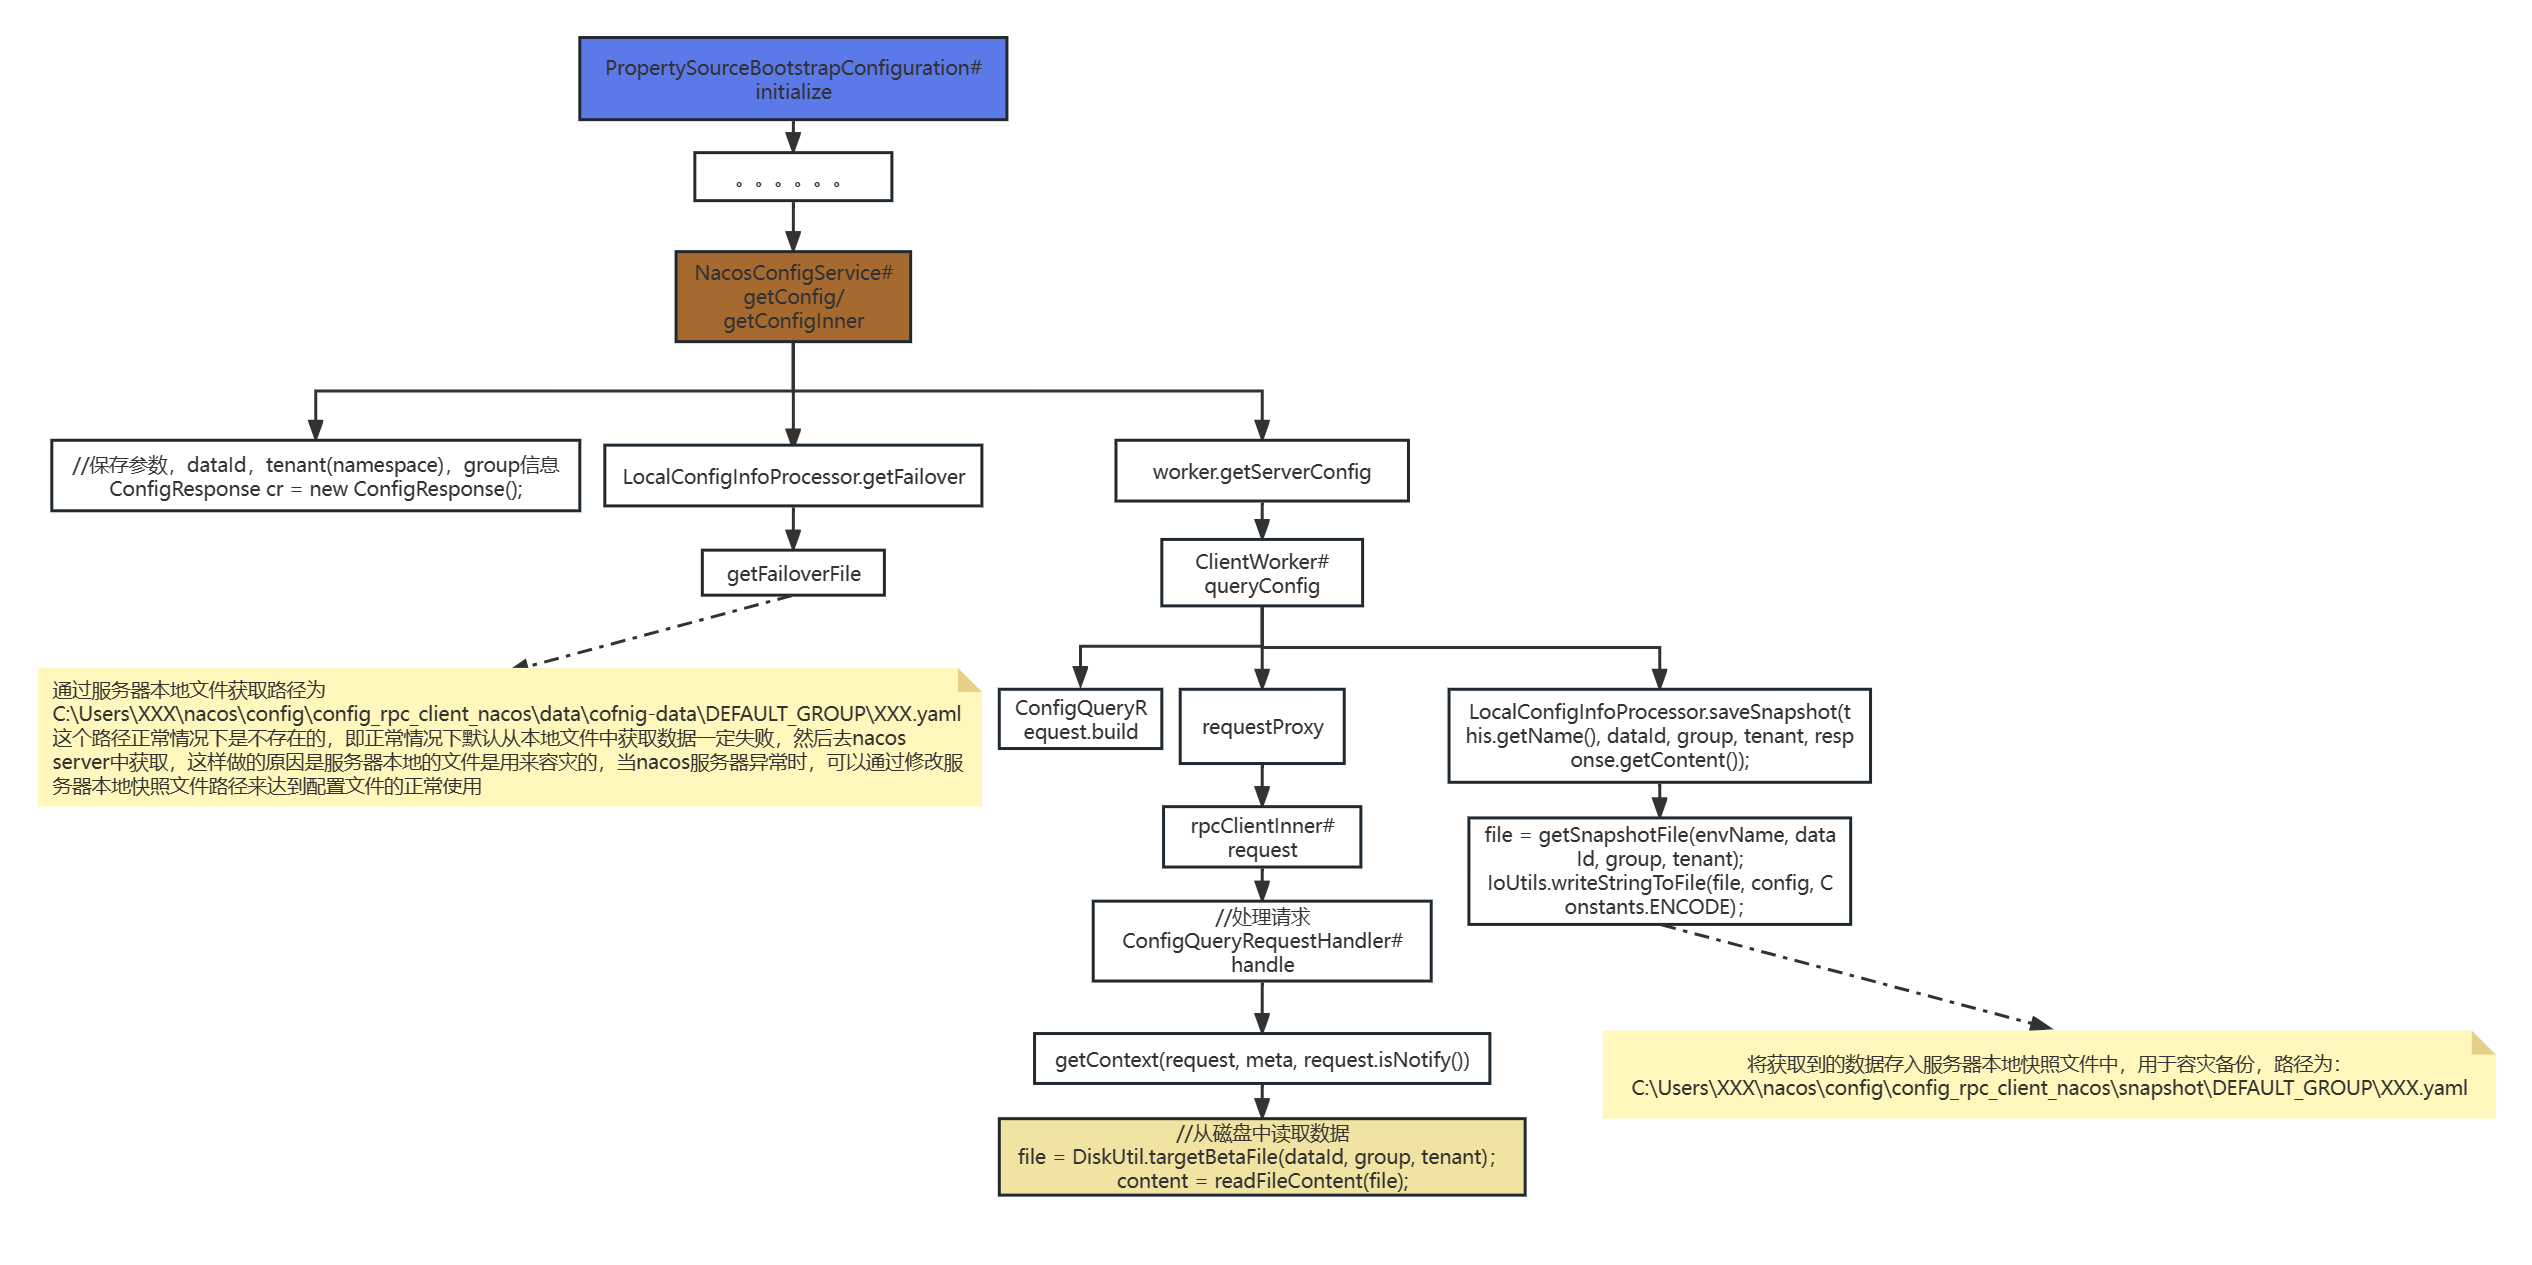
启动服务时,会从nacos server上获取配置信息[bootstrap.yaml中配置的],然后保存到environment中的属性配置源PropertySource中。具体使用的是Spring生态中的扩展点:ApplicationContextInitializer。在Spring Cloud提供的初始化器就是PropertySourceBootstrapConfiguration#initialize方法。
2.3 获取配置
2.4 添加监听与配置变更图